Why does how my dog sits matter?
I was 1/3 of the way to my first open obedience title when I found out that there is more than one way for a dog to sit.
We were having a particular problem where my dog would come flying back on the retrieve, punch me in the stomach with the dumbbell, and then sit a full arm’s length away from me. I was perplexed… how is that even possible? A kind handler ringside commented to me that it was because she was “rocking back” into her sit, and I needed to teach her to tuck. What?
That was the beginning of my fall down the rabbit hole of sit.
You may be now where I once was… sit means the dog puts her rump on the ground. It’s pretty black and white, right? If none of the dog is on the ground, she’s standing. If half of the dog is on the ground, she’s sitting. If the whole dog is on the ground, she’s laying down. Simple?
Not so simple.
It turns out there is a WIDE range of ways for a dog to end up with her rump on the ground, and some are better than others.
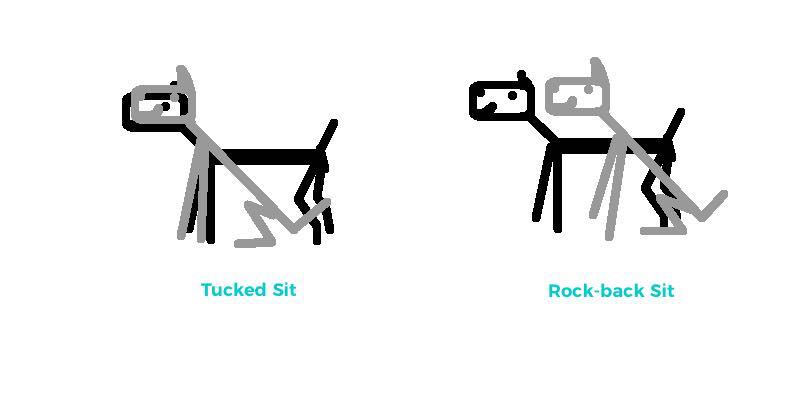
For obedience purposes, we want to consider both the end position, the picture of how the dog ends up with all her body parts while sitting. But we also want to consider the *action* the dog takes to get into that position. And in fact, depending on which parts move and how, we can actually end up with several different versions of the behavior.
There are two main strategies a dog will use to move from standing to sitting. The dog can either leave the front paws in place and move the rear end up to meet them, or she can leave her rear paws in place and move her front end back to meet them.

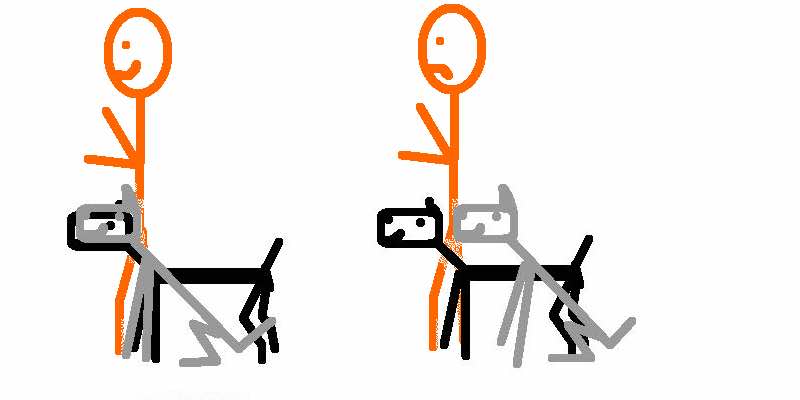
For obedience purposes, we mainly want the tucked sit, but it really only matters in situations where the behavior is performed in a specific position relative to the handler. So basically, heel position or in fronts. This is because the dog’s position in these behaviors is measured by the location of the dog’s shoulder relative to the handler.
So, even if the dog starts out in perfect heel position (shoulder in the same plane as the handler’s leg), rocking back into the sit on a finish or halt will result in a dog that is almost a body length behind where she should be.

Ok, we definitely want that tucked sit for all of our fronts, finishes, and halts. How do we teach it?
Of course, it’s lot easier to teach to a dog who is 6 months old than one who is 6 years old, but still… we can do it. And we have proof!
Well, the good news is that most dogs will do both versions some of the time. So often, it’s just a matter of differentially reinforcing the version we like (tucked), and not so much the other version. But some dogs need a little more help to make the tucking action likely enough that we have something to reinforce.
No worries! We got you covered!
We can split this baby down and teach even the most committed rocker-backer to tuck it up!
The critical difference is in the weight shift. The tucked sit is performed by the dog shifting her weight over her front legs and using her shoulder muscles to support her body while she draws her rear under her. The rock-back is the opposite… you guessed it, the dog shifts her weight back and pretty much lets gravity take care of things.
So our first step is to get that front weight shift.
My favorite way to accomplish this is to put the dog on an “edge” of some kind. I actually like a wide step better than a platform at this stage. I use the front step on my porch, but a curb or really anything much wider than the dog will work. We only need the effect of the edge in the front of the dog, not the sides or back. And many dogs are more comfortable experimenting with their bodies when they don’t have to worry about wobbling sideways.
Have you ever tried to lure a dog into a bathtub? That moment where she’s leaning as faaaarrrr forward as he possibly can, with her neck streeeeetched out all the way, but not putting one single paw in the tub? That’s the effect we are looking for here.
Step 1: Leaning forward
1. Start by standing in front of the dog and reinforcing several times for front feet up on the step. We want her feet nice and sticky on the edge of that step. If she steps forward off the step, just stop reinforcing and lure her back on.
2. Start hand targeting her a tiny bit forward. Initially, present your hand target just over her toes so she can easily touch it. Continue to mark and reinforce for front feet on the step.
3. Incrementally present that target hand farther and farther away from her nose, so that she leans farther and farther forward to touch the target.
As the hand target starts getting farther away, you’ll notice her rear end starts to reach underneath herself a little… and then a little more. This is the first stage of a tucked sit! YAY!
It’s important to remember that for dogs who have always rocked back into their sits, their shoulder muscles may not actually be strong enough to support their weight this way for a while. Practice this exercise in short sessions for a week or two and give those muscles a chance to strengthen before moving on.
Step 2: Tucking on a platform
Once we’ve got the dog comfortable leaning forward on the edge of the step, the next step I like to take is to move it to a platform. I still like a bigger, wider platform than most “traditional” sit platforms. I have found that when teaching a tucked sit from scratch, I get the happiest dogs and cleanest behavior by using a platform that is about 2/3 the length of the body of the dog. This means that when the dog has her front feet planted on the platform and starts to lean forward, her hind feet will feel the edge of the platform and tend to step up. We can capture that first step of the hind paw under the body with a click. The tactile feedback from the edge of the platform really seems to help cement the intent of the action in the dog’s mind. Using a longer platform (rather than a square one) means that it’s easier for the dog to get that most difficult first step, resulting in a higher rate of reinforcement and less prompting needed from the handler. Once we get that first hind leg up on the platform, we are usually ready to rock!
1. Set the dog up in front of you so that her front paws are planted on the front edge of the platform. Her hind feet, however, will be on the ground. Reinforce several times as before to stick those front feet in place.
2. Start presenting that hand target, first easy, the farther and farther forward.
3. As the dog starts to lean, watch for that first hind foot to step up on the edge of the platform. When you get that, jackpot and take a break!
4. Keep shaping that lean forward until you get both hind paws up on the platform.
5. From there, begin to present your hand target, still forward, but now up a little. The dog should end up tucking into a sit!
An alternative that I really like here is to do the same exercises, but using a chin rest instead of a nose touch. Both can work, but the slightly different angle of the chin rest sometimes enhances the effect. So try both! Let me know what you find!
Check out this video from one of my amazing students, which shows several variations of this process:
Step 3: Fade the platform
Here I like to switch to a flat, front paw only target. A mouse pad, placemat, or similar… anything to keep the dog thinking a little about keeping her front feet in place. It’s also helpful from the trainer’s perspective because it makes it easy to see if the dog is truly tucking into the sit and maintain criteria.
1. Repeat the steps above, first reinforcing several times for having the front paws on the target.
2. Then start your targeting forward procedure. It should go more and more quickly since this feels familiar to the dog at this point.
3. Once the dog is happily hopping forward into the sit, it’s time to add the cue! Give your verbal cue just before presenting your hand for the target.
3. When your dog is anticipating on the verbal, meaning she starts sitting even before you bring your hand target out, you are ready to lose the target!
You did it! Your dog now has a tucked sit! Way to go!
